

How to Clean Leather Car Seats with Household Products

Maintaining leather car seats doesn’t have to be expensive or complicated. With the right household products, you can achieve professional-level results without stepping out of your home. At Monster Detailing School, we specialize in teaching sustainable and effective detailing methods, ensuring our students lead the industry. Here’s our expert guide to keeping your leather seats spotless using items you likely already have at home. Why Leather Seats Need Special Care Leather is a delicate material that requires a gentle approach. Dirt, body oils, and grime can accumulate, leading to cracks, discoloration, and wear over time. Using household products ensures cost-effective cleaning, but it’s important to select items that clean without damaging the leather. Essential Household Products for Cleaning Leather Seats Here are a few items that can safely clean your leather car seats: Guide to Cleaning Leather Car Seats Follow these simple steps to clean and restore your leather seats: 1. Dust and Vacuum the Seats Before applying any products, remove dust and debris. Use a soft-bristle vacuum attachment to reach into crevices without scratching the leather. This prevents dirt from embedding into the material during cleaning. 2. Create a Mild Cleaning Solution Mix one part mild dish soap with five parts warm water in a bowl. For tougher stains, you can substitute dish soap with equal parts white vinegar and water. 3. Test in an Inconspicuous Spot Before applying the solution, test it on a hidden area of the seat to ensure it doesn’t cause discoloration or damage. 4. Clean with a Microfiber Cloth Dip a microfiber cloth into the cleaning solution, wring it out, and gently wipe the seats. Use circular motions to lift dirt without applying too much pressure. 5. Rinse and Dry Use another damp microfiber cloth to wipe away any residue, then dry the area with a clean, dry cloth. Never allow leather to air dry, as it can stiffen or crack. 6. Remove Tough Stains with Baking Soda Sprinkle baking soda directly onto grease stains and let it sit for a few hours. The baking soda will absorb the grease. Wipe it away with a damp cloth. 7. Condition with Olive Oil After cleaning, use a small amount of olive oil on a microfiber cloth to condition the leather. This step keeps the material supple and adds a natural shine. Related Blogs: Common Mistakes to Avoid Benefits of Regular Leather Maintenance Related Blog: How to Clean and Maintain Dirty Leather Car Seats Let Monster Detailing Be Your Partner in Car Care Cleaning your leather seats at home is simple with the right steps and products. However, for truly professional results, trust Monster Detailing School to guide you. We are committed to providing our students with the skills and knowledge needed to excel in the detailing industry. With our help, you can ensure every car you touch looks its best. Follow us to learn more about our training programs and tips to achieve showroom-quality detailing. Whether you’re a professional or a car enthusiast, we’re here to elevate your skills.
How to Clean Perforated Leather Car Seats
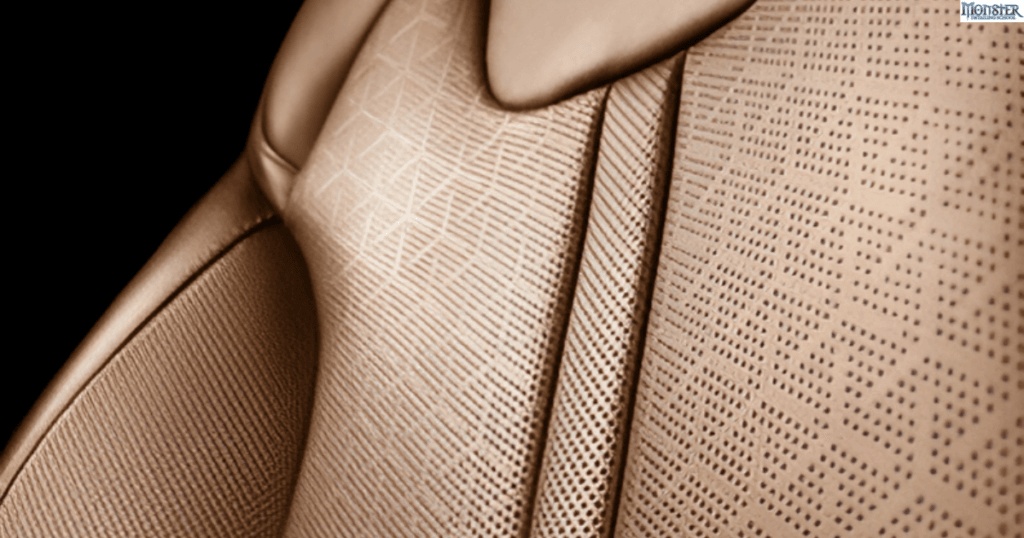
Perforated leather car seats are a luxurious addition to any vehicle, offering style and comfort. However, their unique design requires a careful approach to cleaning, as the tiny holes can trap dirt and liquids. At Monster Detailing School, we specialize in equipping professionals and enthusiasts with the skills to care for delicate materials like perforated leather. Here’s a concise, focused guide on how to clean these seats effectively without risking damage. Tools and Materials Needed At Monster Detailing School, we stress the importance of selecting high-quality, eco-friendly products to achieve professional results safely. Step-by-Step Cleaning Guide 1. Vacuum the Seats Use a vacuum cleaner with a soft brush attachment to remove dust, dirt, and debris from the seat surface. Pay close attention to the perforations, as these can trap particles that degrade the leather over time. 2. Apply Leather Cleaner Spray a small amount of cleaner onto a microfiber cloth—never directly onto the seat. Gently wipe the surface in circular motions, focusing on areas with visible stains. Here is a detailed guide on how to get stains out of leather car seats. 3. Clean the Perforations Use compressed air to blow out dirt and debris lodged in the perforations. Keep the can at an angle to ensure particles are ejected without being pushed deeper. 4. Lightly Scrub Stubborn Areas For areas with ingrained grime, gently scrub with a soft-bristle brush. Avoid applying too much pressure, which could damage the leather or widen the perforations. 5. Wipe and Dry Thoroughly wipe the seat with a clean, dry microfiber cloth to remove excess cleaner and moisture. Check the perforations to ensure they are dry, as lingering moisture can lead to mold or odors. 6. Apply Leather Conditioner Once the seats are completely dry, apply a leather conditioner using a microfiber cloth. This step restores the leather’s moisture balance and provides a protective layer to prevent cracking. Maintenance Tips 1. Clean Regularly: Vacuum and clean perforated leather seats once every few weeks to prevent buildup. 2. Protect from Spills: Wipe up spills immediately to avoid liquid seeping into the perforations. 3. Use UV Protectant: Shield your seats from sun damage with a leather-safe UV protectant. 4. Avoid Over-Saturating: Always use minimal product to prevent clogging the perforations. Related Topic: How to Clean and Maintain Dirty Leather Car Seats Why Choose Monster Detailing School? At Monster Detailing School, we train students in sustainable and effective detailing techniques, including advanced leather care. Our mission is to provide unparalleled education using top-tier products and equipment. Highlights of Our Training: Certified Expertise: Courses led by International Detailing Association-certified trainers. Comprehensive Curriculum: Covers every detail, from basic cleaning to luxury detailing. Global Accessibility: Multilingual training available in the U.S., Argentina, and Mexico. Enroll Today Whether you’re a professional looking to enhance your skills or an enthusiast passionate about car care, Monster Detailing School is your gateway to mastering the art of detailing. Visit our website at Monster Detailing School to learn more about our courses and take the first step toward becoming a leader in the industry.
How to Get Stains Out of Leather Car Seats

Leather car seats elevate the look and feel of any vehicle, but stains can quickly diminish their elegance. Knowing how to effectively clean and maintain leather seats is essential for preserving their beauty and durability. At Monster Detailing School, we specialize in teaching the art of automotive care, offering top-tier training and advanced techniques to keep your car seats in pristine condition. In this blog, we’ll guide you through proven methods to remove stains from leather car seats, including practical tips and recommended products. Understanding Leather and Common Stains Before diving into cleaning, it’s crucial to understand the type of leather in your car seats. Most automotive leather is treated, but different finishes may require unique cleaning methods. Common stains include: Recognizing the type of stain helps in selecting the best cleaning approach. Step-by-Step Guide to Remove Stains from Leather Car Seats Step 1: Prepare Your Tools Before starting, gather these essentials: Monster Detailing School emphasizes using high-quality tools and products to avoid damaging the leather. Step 2: Blot, Don’t Rub For fresh stains, gently blot the area with a clean, dry microfiber cloth. Avoid rubbing, as this may push the stain deeper into the leather pores. Step 3: Use a Leather Cleaner Apply a small amount of leather cleaner to a soft cloth and gently clean the stained area. Work in a circular motion for even application. At Monster Detailing School, we teach students the importance of using pH-balanced cleaners to protect leather surfaces. Step 4: Address Specific Stains Step 5: Condition the Leather After cleaning, apply a leather conditioner to restore moisture and prevent cracking. Conditioning also adds a layer of protection against future stains. Preventing Future Stains Keeping leather seats stain-free requires regular maintenance: At Monster Detailing School, we teach preventative care as a cornerstone of detailing excellence. Frequently Asked Questions 1. Can I use household products on leather seats? Yes, mild soap, white vinegar, and baking soda can be used for cleaning. However, always test on a hidden area first. Checkout our detailed guide on this specific query. 2. How often should I clean leather car seats? Regularly wipe seats weekly and perform deep cleaning every 2-3 months. 3. What’s the best product for leather cleaning? We recommend pH-neutral leather cleaners available at detailing supply stores. Join Monster Detailing School Today! Removing stains from leather car seats doesn’t have to be a daunting task. With the right techniques, tools, and guidance from Monster Detailing School, you can keep your leather seats looking as good as new. Checkout our blog on how to clean and maintain dirty leather car seats. Whether you’re a car enthusiast or aspiring professional, we’re here to help you succeed. Our training programs are designed to provide you with the knowledge and confidence to excel in the detailing industry. Visit our website, Monster Detailing School, to learn more about our courses and take your skills to the next level!
Can I Wash My Car After Tinting Windows?

Tinting your car windows is a popular upgrade that enhances both aesthetics and comfort. However, if you’ve just had your windows tinted, you may be wondering if it’s safe to wash your car. Proper care is essential to ensure the longevity of your window tint, and at Monster Detailing School, we not only offer premium detailing services but also specialize in certified window tinting training for professionals eager to excel in this craft. Let’s explore the dos and don’ts of washing your car after tinting. The Waiting Period: Why It’s Crucial When you tint your windows, the film requires time to properly adhere to the glass. This process, known as curing, can take up to 5-7 days depending on weather conditions. Washing your car or rolling down windows after tinting too soon may risk damaging the tint, especially if high-pressure water or abrasive materials are used. We train our students to understand these critical aspects along with the legalities of window tinting during our classes, emphasizing the importance of patience and proper care techniques. What Happens If You Wash Too Soon? Premature washing can lead to: Water can seep under the edges of the tint film. Improper cleaning tools or materials may damage the film. The adhesive may not fully cure, reducing the longevity of the tint. At Monster Detailing School, we teach our trainees the best practices to avoid these pitfalls through our hands-on training courses. How to Wash Your Car After Tinting Once the curing period is complete, you can safely wash your car, but follow these tips for the best results: Stick to soft clothes and mild soap. Avoid brushes or anything abrasive. Ammonia-based cleaners can damage the tint film. A microfiber cloth is ideal to prevent scratches or streaks. Our comprehensive tinting classes cover these techniques and more, equipping professionals with the skills to educate their clients on proper aftercare. Why Choose Monster Detailing School? At Monster Detailing School, we are dedicated to training the next generation of detailing experts. Our auto detailing training courses, including tint training, combine advanced technology with proven methods to help our students become leaders in the industry. Here’s what sets us apart: Our window tint certification ensures you meet the highest industry standards. Learn from experienced professionals who bring years of real-world expertise. With training centers in Florida, Argentina, and Mexico, our reputation for excellence is unmatched. Enrolling in our window tint classes will give you the confidence and knowledge to provide your clients with outstanding results, from tint application to aftercare or window tint removal. Additional Aftercare Tips for Tinted Windows Allow the tint to fully cure before using rear defrosters. Small bubbles are normal during curing but should disappear within a week. If not, consult a professional. Park in shaded areas to prevent excessive heat from interfering with the adhesive. Using AC after window tinting can help prevent excessive heat buildup, especially on hot days keeping the interior dry and comfortable. Understanding these nuances is part of the curriculum at our window tint training courses, where we teach students not just the “how,” but the “why” behind every step. Conclusion If you’re passionate about cars and want to turn your interest into a thriving career, there’s no better place than Monster Detailing School. Our comprehensive training programs, from window tinting to advanced detailing techniques, provide you with the tools to succeed. Visit us today to learn more about our courses. We’re here to help you master the art and science of automotive detailing, ensuring your clients drive away with satisfaction every time. Related Blogs:
What is the Legal Window Tint in Florida?

Florida is known for its sunny climate, making window tinting a popular option for car owners to reduce glare, protect interiors, and enhance privacy. However, it’s crucial to understand Florida’s window tint laws to avoid fines and ensure safety. Florida Window Tint Laws Window tinting laws in Florida are specific and vary depending on the type of vehicle and window. Here’s what you need to know: 1. Windshield: A non-reflective tint is permitted above the manufacturer’s AS-1 line. 2. Front Side Windows: The tint must allow at least 28% of light to pass through. 3. Rear Side Windows: Cars must have at least 15% visible light transmission (VLT), while multipurpose vehicles require at least 6%. 4. Rear Window: Similar to rear side windows, cars require at least 15% VLT, and multipurpose vehicles need 6% VLT. These regulations are designed to balance comfort, privacy, and road safety. Monster Detailing School ensures that our window tint training includes in-depth knowledge of these legal requirements, so our students excel in their craft. You might also be interested in following topics: Why Window Tint Laws Matter Ignoring tint laws can lead to hefty fines, and excessive tinting can hinder visibility for drivers and law enforcement officers. By attending window tinting classes at Monster Detailing School, you will not only master tint installation but also understand how to educate your clients about compliance. How Monster Detailing School Can Help You At Monster Detailing School, we take pride in offering premier training to aspiring window tint professionals. Here’s what sets us apart: 1. Expert Instructors: Our courses are taught by certified professionals with years of experience in the industry. 2. Hands-On Learning: Students gain practical skills by working on real vehicles, ensuring confidence in their abilities. 3. Advanced Technology: We use the latest tools and materials to teach cutting-edge techniques. 4.Comprehensive Curriculum: From mastering the art of cutting and applying tints to understanding legal requirements, our window tint certification program covers it all. Benefits of Legal Window Tinting Adhering to Florida’s window tinting laws provides numerous benefits: Proper tinting blocks harmful UV rays and reduces heat buildup inside vehicles. Legal tinting enhances the overall look of a car without compromising safety. Tinted windows can deter theft and protect passengers from shattered glass during accidents. Common Mistakes in Window Tinting Many DIY enthusiasts and untrained professionals make errors that result in non-compliance, such as: Applying darker tints than permitted by law. Bubbles or peeling that reduce effectiveness and aesthetic appeal. Failing to check for state-specific regulations. Our training ensures you avoid these mistakes, teaching you to deliver top results that meet legal standards. Build Your Career with Monster DetailingSchool Florida’s bustling auto market provides ample opportunities for skilled tint professionals. Monster Detailing’s auto detailing classes equip you with the expertise to thrive in this competitive field. Whether you’re starting your business or enhancing your skills, we have the right program for you. By getting our certification, you’ll gain the confidence and credentials needed to succeed. Plus, our training is offered in multiple languages, making it accessible to a diverse audience. Enroll in Our Window Tinting Classes Today! If you’re ready to become a certified window tint professional, we are here to help. Visit Monster Detailing School to learn more about our courses and enroll today. Whether you’re interested in automotive tinting, detailing, or paint protection, we offer the expertise you need to succeed. Our dedicated team is committed to your success, providing a foundation that blends technical skills with industry knowledge. Let us help you shine in your career while ensuring your clients remain safe and compliant with Florida’s laws. More related blogs:
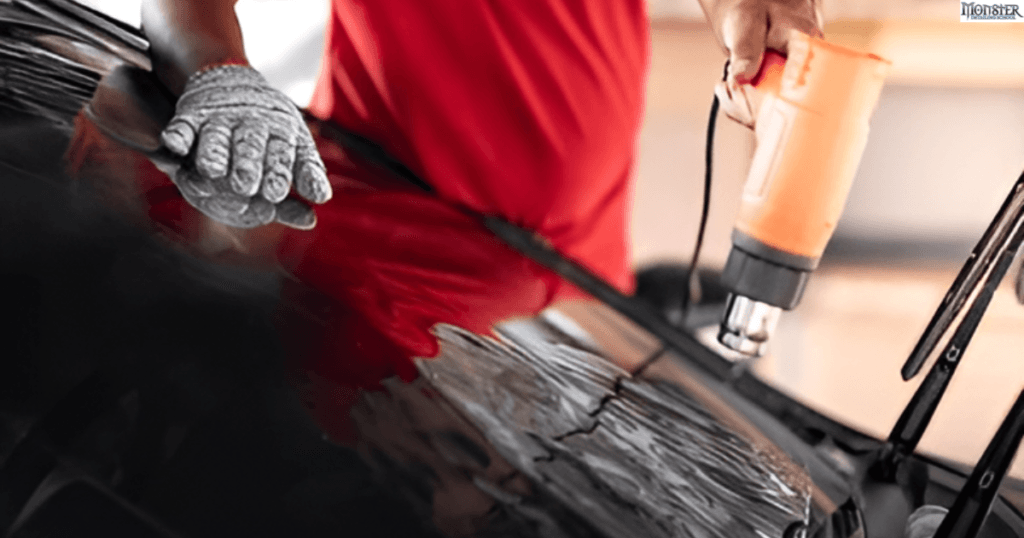
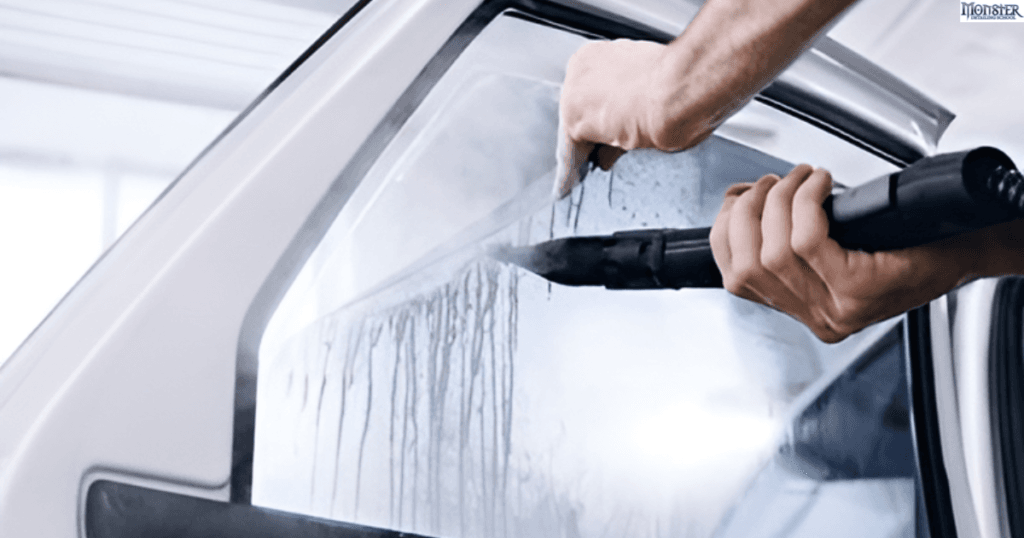
How to Remove Adhesive from Tinted Windows

It might be difficult to remove glue from tinted windows, particularly if you’ve never done it before. The proper equipment and methods are needed to remove adhesive without causing damage to the tint, whether it’s from stickers, stickers, or a poorly done tint job. At Monster Detailing School, we give our pupils state-of-the-art techniques so they may confidently and accurately tackle such issues. To help you safely and successfully clean your tinted windows, let’s walk you through each stage of the procedure. Step 1: Gather Your Tools Before starting, assemble the necessary materials: Step 2: Test a Small Area Tinted windows are sensitive, and some chemicals can cause damage. Always test your adhesive remover on a small, inconspicuous area to ensure it won’t harm the tint. Step 3: Soften the Adhesive Spray the affected area with warm, soapy water and let it sit for a minute. This helps to soften the adhesive, making it easier to remove. For more stubborn adhesive, you can use a heat gun or hairdryer on a low setting to gently warm the area. Step 4: Apply the Adhesive Remover Dampen a microfiber cloth with adhesive remover and gently rub the affected area. Avoid pouring the solvent directly onto the window, as it could seep under the tint and cause damage. Use circular motions to lift the adhesive without scratching the surface. Step 5: Scrape Off Residue Use a plastic scraper or the edge of a credit card to carefully remove the loosened adhesive. Hold the scraper at a shallow angle to avoid tearing the tint film. Step 6: Clean the Window Once the adhesive is removed, clean the window with warm water and a mild soap solution. Use a fresh microfiber cloth to wipe away any remaining residue. Ensure the window is completely dry to prevent streaks. Why Proper Training Matters Adhesive removal is just one of the many challenges you may face as a detailing professional. Monster Detailing School offers comprehensive courses, and window tinting classes is just one of them, where students learn the skills needed to excel in the detailing industry. Our tint training program combines hands-on practice with expert instruction on application and compliance with local regulations, ensuring you can tackle real-world scenarios with confidence. Whether you’re just starting out or looking to refine your skills, our tint classes and certification programs are designed to make you an industry leader. Why Remove Adhesive Correctly? Poor adhesive removal techniques can lead to scratched tint, discoloration, or even the need for a full tint replacement. Mastering this skill not only enhances your credibility as a detailer but also ensures customer satisfaction. At Monster Detailing School, we emphasize these best practices, enabling our students to deliver flawless results. Enroll in Our Training Today! If you’re ready to elevate your detailing career, join us at Monster Detailing School. We’re committed to offering the best training in window tinting and more. Visit Monster Detailing School to explore our programs and book your spot today! Let us help you become a leader in the detailing industry with the skills and knowledge to provide top-tier services. Related Blogs:
Can You Use AC After Tinting Windows?
Window tinting is a popular upgrade for vehicles, offering numerous benefits such as improved privacy, reduced glare, and enhanced interior protection from UV rays. However, many drivers are unsure about the proper care routine after getting their windows tinted. In this blog you will get a clear answer to your question and additional tips to ensure your tint lasts and performs optimally. Is It Safe to Use AC After Tinting Windows? Yes, you can absolutely use your air conditioning (AC) after tinting your windows. In fact, turning on the AC can help regulate the temperature inside the vehicle, creating a favorable environment for the tint film to adhere and cure properly. Tint films often need time to bond fully with the glass, and keeping the car interior cool can support this process. Why AC Can Be Beneficial After Tinting: 1. Regulates Heat: AC prevents excessive heat buildup, especially on hot days, which could affect the curing process of the adhesive. 2. Reduces Moisture: If condensation or humidity is present, the AC helps in keeping the interior dry and comfortable. While using the AC is safe, it’s essential to avoid any activities that might disturb the film before it has fully cured, such as rolling down the windows or cleaning them. Post-Tinting Care: What You Should Know After installing window tint, there’s a short curing period during which the tint adheres securely to the glass. Here are some important dos and don’ts during this time: Dos: 1. Use the AC: As mentioned, using your AC to maintain a stable interior temperature is perfectly fine. 2. Park in the Shade: If possible, park in a shaded area to prevent prolonged exposure to direct sunlight, which might create uneven curing conditions. 3. Be Patient: Depending on the climate, the tint curing process can take 3-7 days. During this time, avoid unnecessary interactions with the windows. Don’ts: 1. Avoid Rolling Down Windows: Refrain from rolling down windows until the curing process is complete. Doing so could cause the edges of the tint to peel or crease. Read the complete guide here. 2. Do Not Wash the Windows: For at least a week, avoid washing the windows after tinting to prevent damage to the still-setting film. Following these tips ensures that your tint cures properly, maximizing its durability and performance. Understanding the Tint Curing Process Window tint installation involves applying a thin film to the glass surface using an adhesive. This adhesive needs time to dry and cure fully. Curing time can vary based on factors like weather conditions and the type of tint used. In warmer regions, the curing process is often faster due to the heat, but excessive direct sunlight can still be harmful. In cooler areas, curing may take longer, making controlled environments (like an air-conditioned car) ideal. Related Blog: From Tinting to Drying: How Long Does the Window Tinting Process Take? Learn the Art of Window Tinting with Window Tint Training At Monster Detailing School, we are not only dedicated to providing exceptional tinting services but also to empowering others to succeed in this field. If you’re interested in mastering the art of tinting, consider enrolling in our window tint training classes. Why Choose Our Window Tint Training Programs? Practice real-world tinting techniques to build confidence and skill. Learn from seasoned professionals who understand industry best practices. Gain exposure to the latest tools and materials for tint installation. With certification, you’ll stand out in the competitive detailing industry. Whether you’re starting fresh or want to refine your skills, our classes are designed to help you excel and deliver top-quality results by legal tinting laws. Benefits of Window Tinting Window tinting offers several advantages, making it a worthwhile investment for any vehicle owner. Some of these include: 1. Temperature Regulation: Tint helps reduce interior heat, making your car more comfortable even on sunny days. 2. Enhanced Privacy: It adds an extra layer of privacy, keeping prying eyes at bay. 3. UV Protection: Blocks up to 99% of harmful UV rays, protecting your skin and your car’s interior. 4. Aesthetic Appeal: A professionally tinted vehicle looks sleek and stylish. These benefits highlight why proper care post-installation, including controlled use of AC, is essential for long-lasting results. Related Blog: How Much Does It Cost to Tint Car Windows? Conclusion Using your AC after tinting your windows is completely safe and even beneficial. By maintaining a controlled environment, you can ensure the tint film adheres properly, enhancing its durability and performance. Combine this with proper post-installation care, and you’ll enjoy all the benefits of window tinting for years to come. For those interested in learning professional techniques, our window tint training classes at Monster Detailing School provide the perfect opportunity to become an expert in the field. With comprehensive education and hands-on experience, we help students master the craft and lead in the detailing industry. More topics related to window tinting:
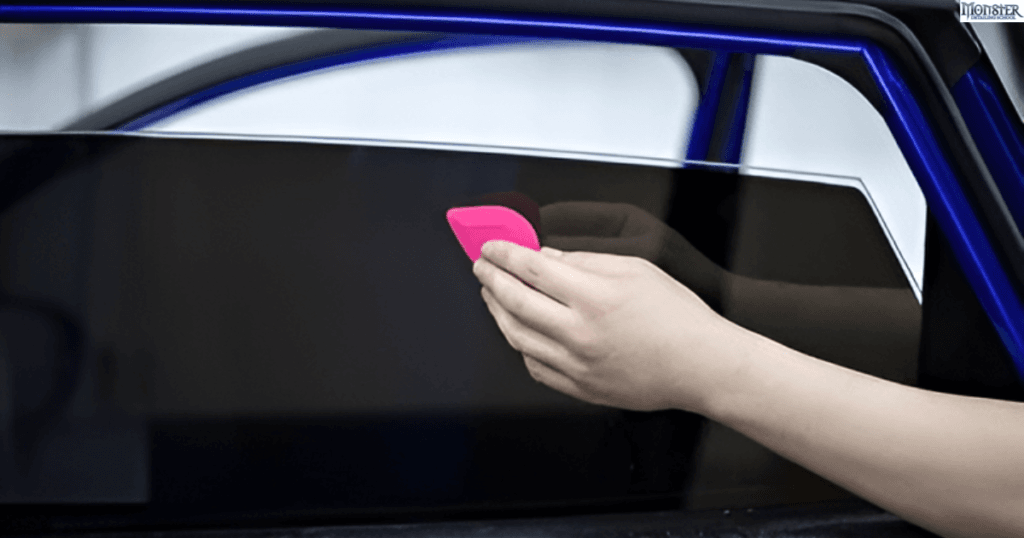
Does Window Tint Go on the Inside or Outside?
If you’re exploring the art and science of window tinting—whether as an enthusiast or an aspiring professional—you’ve likely come across one essential question: does window tint go on the inside or the outside of car windows? The answer lies in both practicality and technique, and understanding this can make all the difference in the durability and performance of the tint. At Monster Detailing School, we’re dedicated to equipping professionals with advanced skills and industry insights through our window tint training programs. This blog will walk you through the fundamentals of window tint application, highlighting why the inside installation is preferred and how this knowledge can help you succeed. Window Tinting: Inside vs. Outside The Preferred Method: Inside Application The vast majority of window tinting is done on the inside of the window. Here’s why: 1. Protection from External Elements The inside of a car window is a controlled environment. By applying tint film here, it is safeguarded against rain, dirt, dust, and harmful UV rays that could damage the adhesive and degrade the tint over time. This ensures the tint remains intact, looks great, and performs effectively for years. 2. Enhanced Durability Window tint is a thin polyester film that can be vulnerable to wear and tear. External installation exposes it to cleaning agents, scratches, and environmental damage, while interior placement protects it from such risks. 3. Optimized UV Protection Tint applied to the inside offers superior protection from UV rays. This ensures not only the longevity of the film but also shields passengers and interior materials from sun damage. 4. Improved Aesthetics Interior installation results in a seamless, polished appearance. By placing the tint inside, professionals can avoid peeling edges and ensure the film adheres perfectly to the glass. Related Blog: How Long Should You Wait to Roll Down Your Windows After Tinting? What About Exterior Application? While exterior tinting is possible, it is less common and typically used for temporary purposes or specialized projects. For instance, exterior application might be used in pre-cut designs to fit custom specifications, but it comes with significant drawbacks: 1. Exposure to the Elements: Exterior tint films are far more likely to peel, bubble, or scratch due to environmental factors. 2. Frequent Maintenance: Cleaning and maintaining exterior tints can be challenging, as abrasive cleaners and even car washes can cause damage. 3. Shortened Lifespan: External tints degrade faster, making them less cost-effective for vehicle owners. The Process of Window Tinting Understanding the proper process of window tinting is essential for achieving professional results. Here’s a quick overview: 1. Preparation 2. Application 3. Finishing Touches If you are interested to know the process in detail check out our blog on how long does the window tinting process take? Why Invest in Professional Window Tint Training? Window tinting is both an art and a science, requiring a blend of technical expertise and practical skills. For those entering the detailing industry, professional training can make all the difference in achieving success. Here’s how: 1. Master Advanced Techniques Learn the nuances of tint application, including how to tackle complex shapes and avoid common issues like bubbling or uneven edges. Our training programs emphasize precision and efficiency, ensuring you can deliver high-quality results. 2. Understand Best Practices From choosing the right film to complying with local regulations, professional training equips you with the knowledge needed to meet customer expectations and ensure long-term satisfaction. 3. Build Confidence and Credibility Earning a certification from a recognized program like Monster Detailing School demonstrates your commitment to excellence. This not only enhances your credibility but also gives clients confidence in your skills. 4. Access to Cutting-Edge Tools Our training programs introduce students to the latest tools and technologies, helping them stay ahead of industry trends. Final Thoughts When it comes to window tinting, understanding the difference between inside and outside application is crucial—not just for delivering superior results but also for building trust with your clients. At Monster Detailing School, our goal is to help you master this craft and position yourself as a leader in the industry. If you’re ready to take your skills to the next level, our window tint training classes are the perfect place to start. With expert guidance, hands-on practice, and a focus on best practices, you’ll gain the knowledge and confidence to excel. Found this blog helpful? Check out other related blogs as well:
How Long Should You Wait to Roll Down Your Windows After Tinting?
Window tinting is a game-changer for any vehicle. Not only does it enhance the aesthetic appeal, but it also provides practical benefits such as reducing glare, blocking harmful UV rays, and improving privacy. However, to get the most out of your tint job, you need to follow post-installation care instructions carefully. One of the most common questions after tinting is, “When can I roll my windows down?” or “Can I use AC after tinting windows?“ We have a separate blog dedicated to the second question, but in this article, we will focus on the first one. Why Timing Matters After Tinting When you have your windows tinted, the film applied needs time to cure. The curing process allows the adhesive to fully bond with the glass. During this time, the tint is vulnerable to damage. If you roll your windows down too soon, you risk the film peeling, bubbling, or shifting out of place. General Guidelines for Rolling Down Windows After Tinting Most experts recommend waiting at least 3-4 days before rolling down your windows. This is the standard curing time under normal weather conditions. However, several factors can influence this timeline: Humid or cold climates may slow the curing process. A professional installation ensures even application and reduces risks of early damage. Some films may have faster curing times depending on their composition. Related Blog: From Tinting to Drying: How Long Does the Window Tinting Process Take? Can You Roll Your Windows Down After 24 Hours? Although you might be tempted to roll your windows down after a day, it’s best to err on the side of caution. After 24 hours, the adhesive may not have set completely, making the tint susceptible to damage. Waiting a little longer ensures the film stays securely in place and avoids costly repairs or replacements. What About Rolling Them Down After Two Days? At the 48-hour mark, the adhesive bond might still be in the process of strengthening. While some tint jobs may cure faster, particularly in warmer climates, the general rule of thumb remains the same: wait at least three full days before rolling your windows down. Patience is key to achieving a flawless finish that lasts. The Risks of Rolling Down Too Soon Rolling down your windows prematurely can lead to several issues, including: The film may start to lift at the edges, ruining its seamless appearance. Air pockets can form under the film, causing unsightly bubbles. Weak adhesion might result in the film detaching from the glass, forcing you to window tint removal. Investing in high-quality window tinting comes with a cost, so it’s worth taking the time to let it cure properly. Trust us, the wait will be worth it. Related Blog: How to Remove Adhesive from Tinted Windows Professional Window Tint Training: Master the Art of Tinting At Monster Detailing School, we don’t just offer exceptional tinting services—we’re passionate about teaching others how to excel in this craft. Our window tint training classes are designed for aspiring professionals who want to deliver high-quality results and become leaders in the detailing industry. Why Choose Our Window Tint Training? 1. Comprehensive Curriculum: From basic techniques to advanced skills and compliance with legal laws, our classes cover everything you need to know about window tinting. 2. Hands-On Experience: Practice on real vehicles to build confidence and expertise. 3. Latest Technology: Learn to use the most advanced tools and materials available. 4. Multilingual Instruction: Our courses cater to a diverse audience, ensuring inclusivity. 5. Sustainability Focus: We emphasize eco-friendly practices that align with modern industry standards. Whether you’re starting your career or looking to refine your skills, our training equips you with the knowledge and techniques to succeed. Related Blog: How Much Does It Cost to Tint Car Windows? Expert Tips for Post-Tint Care To keep your tint looking pristine, follow these simple tips: 1. Avoid Cleaning Right Away: Don’t clean or wash windows after tinting for the first week. This allows the film to be set without disruption. 2. Use Ammonia-Free Cleaners: Harsh chemicals can degrade the tint over time. Stick to tint-safe products for maintenance. 3. Handle Windows Gently: After the curing period, roll windows up and down slowly to minimize stress on the edges. Taking care of your tint from day one ensures its longevity and keeps your vehicle looking sleek and stylish. Commonly Asked: Does Window Tint Go on the Inside or Outside? Why Choose Monster Detailing for Your Tinting Needs? At Monster Detailing School, we combine superior craftsmanship with cutting-edge technology to deliver unmatched results. Our team is committed to providing the best services while educating the next generation of detailers. Whether you’re looking for a tint job or want to learn the trade through our car detailing classes, we’re here to help you succeed. Our Commitment We believe in empowering students through education. Our training programs are designed to not only teach technical skills but also instill a commitment to quality and sustainability. By joining our program, you’ll gain the tools and confidence to build a thriving career in the detailing industry. Our training programs: Conclusion Rolling down your windows after tinting may seem like a small action, but it’s one that can have big consequences if done too soon. By waiting at least 3-4 days, you protect your investment and ensure your tint looks flawless for years to come. If you’re passionate about learning more about window tinting, consider enrolling in our training classes at Monster Detailing School. With expert guidance and hands-on experience, you’ll be equipped to deliver professional results and stand out in the detailing industry.
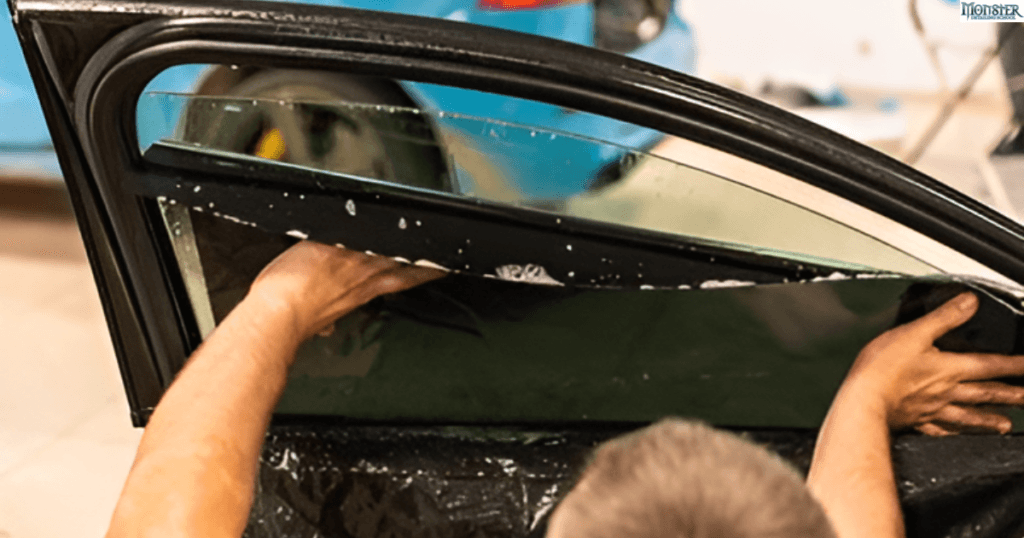
How to Remove Window Tint: Should You Do It Yourself?
When it comes to car detailing, window tinting is often chosen for its aesthetic appeal, privacy, and heat reduction. However, there are situations where removing window tint becomes necessary, such as bubbling, fading, or legal compliance. While many people consider tackling this project on their own, it’s essential to weigh the challenges and possible complications. If you’re considering a career in detailing, window tinting, or even removal, professional window tint training and certification can equip you with practical skills and insights to perform these tasks confidently. At Monster Detailing School, we offer comprehensive training using advanced techniques to ensure our students become industry leaders, providing services sustainably and effectively. Here’s a complete guide to removing window tint and deciding if DIY or professional help is best. Related Blog: From Tinting to Drying: How Long Does the Window Tinting Process Take? Why Remove Window Tint? 1. Legal Reasons: Some regions enforce specific tinting laws. If your tint exceeds legal limits, you may need to remove or replace it. 2. Aesthetic Wear: Over time, tints can bubble, peel, or fade, reducing your car’s aesthetic appeal. 3. Improved Visibility: Removing a dark or deteriorating tint can improve visibility, especially at night. The Challenges of Removing Window Tint Yourself While DIY window tint removal may seem straightforward, it requires care, patience, and specific techniques to avoid damage to the glass or defroster lines. Plus, removing the tint adhesive is another challenge. Pros of DIY Window Tint Removal Removing tint yourself can save money on professional labor fees. You can do it at your own pace, without needing to book an appointment. Related Blog: How Much Does It Cost to Tint Car Windows? Cons of DIY Window Tint Removal Without proper tools and techniques, you might damage your car’s glass, defroster lines, or interior surfaces. Tint removal can be a lengthy process, especially if the adhesive is stubborn. DIY removal can lead to uneven edges or adhesive residue, which may affect the final look. Guide to DIY Window Tint Removal If you’re ready to tackle this project yourself, here’s a basic method to follow. This approach requires simple materials, though specialized tools taught in professional window tint classes can make the job much easier and more efficient. Tools Needed: Method: 1. Heat the Tint: Use a hair dryer or steamer to warm the window tint. This loosens the adhesive, making it easier to peel off. 2. Peel the Tint: Start at one corner, using a razor blade or utility knife to lift the tint film gently. Slowly peel the tint away from the glass, keeping it at a low angle to avoid tearing. 3. Spray Soapy Water: If adhesive remains on the window, spray it with soapy water. Allow it to soak in for a few minutes to soften the residue. 4. Scrape Adhesive Residue: Carefully scrape any remaining adhesive using the razor blade, keeping the blade at a shallow angle to prevent scratches. 5. Clean the Window: Wipe down the window with a microfiber cloth to remove any leftover residue, leaving it clear and spotless. When to Call a Professional If the window tint is aged or extremely stubborn, or if you’re unsure about DIY, consulting a professional is the safest option. Here are some scenarios where professional assistance is recommended: 1. Complex Windows: Rear windows with defroster lines can be delicate, and removing the tint without causing damage requires expertise. 2. Unusual Adhesives: Some tints use industrial-strength adhesives that may not respond well to standard removal techniques. 3. Time Constraints: Professionals can usually complete the job faster with specialized tools and techniques. Why Consider Professional Training? For those interested in the detailing industry, learning the proper techniques to install and remove window tint is a valuable skill. At Monster Detailing School, we try our best to provide hands-on training to master these techniques. By joining our program, you gain access to: We use the latest tools and methods, helping students stay current with industry standards. We teach our students practical, tested techniques, ensuring their work is safe, effective, and efficient. Our classes cater to a diverse audience, making our training accessible and effective for everyone. Our program is designed to equip students to provide high-quality detailing services and thrive as professionals in the industry. Conclusion Deciding whether to remove window tint yourself or seek professional help depends on the project’s complexity and your comfort level. For basic tint removal, DIY might be a cost-effective option, but professional help ensures quality results with minimal risk. For those pursuing a career in detailing, investing in quality window tinting classes can be a game-changer. With Monster Detailing’s training, you can gain valuable skills in tint installation and removal, ensuring that every vehicle you work on meets the highest industry standards. Whether you’re a DIY enthusiast or an aspiring professional, understanding the techniques and best practices for window tint removal can help you achieve clear, flawless windows. More Topics:
